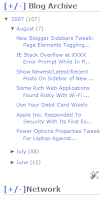
Thinking about saving some precious blog space and have much cleaner look on the sidebars? Then the following new blogger hack for element toggle can give your site/blog a cleaner first impression!
I am talking about able to hide those tedious amount of links and clutters on the sidebars in plain sight and still able to show them if desire! Trust me, your visitors will appreciate by not having to scroll down forever to find the next elements of interest!
By having the abilities to toggling the widget elements which sometimes have long list of links.
It is most useful for the long list of links, text and anything that can be avoid on the first glance and yet able to expand them if need to. Page element toggling involves some JavaScript and a bit of CSS while you need to know how to tweak the new blogger's XML based template.
So make sure that you are familiar with your template before moving on to instruction!(Intermediate level tweak)
(CONTINUE BELOW)
Step 1: Always backup your template before you are making any change!
Step 2: Before copying the template, make sure that your check on Expand Widget Templates! Then copy the template to your favorite editor, because we will use search function of your editor to find the widget element.
Step 3: Copy the following JavaScript and paste it between the < head > < / head >.
<script type='text/javascript'>
<!-- Function used for Sidebar Element Toggling: ElementToggle()-->
function ElementToggle(id) {
var element = document.getElementById(id).getElementsByTagName('div');
for(i = 0; i < element.length; i++) {
attribute = element[i].getAttribute('id');
if(attribute == 'toggle')
{
if (element[i].style.display == 'none')
element[i].style.display = 'inline';
else
element[i].style.display = 'none';
}
}
}
</script>
Step 4: So lets say that you decided to add toggling for Blog Archive element on the side bar, because it takes up too much space vertically(see the right top image).

Step 5: In the Configure Archive, copy the Title text and switch to your editor. Open up the search/find function and paste the title of archive to search...
Step 6: Once you find the match, it should be inside < b:widget > tag(look at left image for detail). In my case, I have "Blog Archive" as title which is go by the id of "BlogArchive1" with the type "BlogArchive"!
Step 7: Look for < h2 > just below them and copy the following JavaScript and paste it right after the < h2 > tag.
<a href='javascript:void(0);' onclick='javascript:ElementToggle("YourWidgetIdHere");'>[+/-]</a>
Step 8: Change the "YourWidgetIdHere" inside the ElementToggle() to the Widget id that you are working on. Here is what mine looks like(right image).

Step 9: Just below it, look for class='widget-content' inside < div > tag and copy id='toggle' style='display:none;' and paste it right after class='widget-content'. (left image)

Step 10: Select all in editor and copy to paste it over at the Template -> Edit HTML area and save it by clicking SAVE TEMPLATE
Go back to your blog homepage and check to see if your blog archive has [+/-] left of the tile of your blog archive! Click on it to see if it expand and click again to hide!
That's it, if it works, great! Oh, if you also like to add the toggling on other widget elements as well, just start over from Step 4 and on! It is a bit repetitive but heck, once you are familiar with it, it is really easy! I managed to change my next new widget with toggling feature in less than 1 minutes! It's that easy! ;)
If it doesn't make sure that you follow each steps correctly and try again. If you still don't get it, you can comment here and I will help.
0 comments:
Post a Comment